E14 | 3-Way Switch, Split Rail Fence | Ask This Old House
Season 24 Episode 14 | 23m 42sVideo has Closed Captions
How to clean up spilled paint; 3-way switches 101; Installing a split rail fence.
Mauro Henrique shares how he cleans up paint when some spills on the floor. Heath Eastman breaks down how 3-way switches work and common wiring mistakes with a clear demonstration. Nathan Gilbert and Lee Gilliam install a classic wooden split rail fence to prevent cars from parking on a homeowner's front lawn.
Problems playing video? | Closed Captioning Feedback
Problems playing video? | Closed Captioning Feedback
Funding for Ask This Old House is provided by The Home Depot, Renewal By Andersen, and ChipDrop.
Support provided by:


E14 | 3-Way Switch, Split Rail Fence | Ask This Old House
Season 24 Episode 14 | 23m 42sVideo has Closed Captions
Mauro Henrique shares how he cleans up paint when some spills on the floor. Heath Eastman breaks down how 3-way switches work and common wiring mistakes with a clear demonstration. Nathan Gilbert and Lee Gilliam install a classic wooden split rail fence to prevent cars from parking on a homeowner's front lawn.
Problems playing video? | Closed Captioning Feedback
How to Watch Ask This Old House
Ask This Old House is available to stream on pbs.org and the free PBS App, available on iPhone, Apple TV, Android TV, Android smartphones, Amazon Fire TV, Amazon Fire Tablet, Roku, Samsung Smart TV, and Vizio.
Keep Exploring

This Old House Insider Newsletter
Get This Old House exclusive stories, tips, and behind-the-scenes information delivered right to your inbox every month.Providing Support for PBS.org
Learn Moreabout PBS online sponsorship♪♪ Kevin: On "Ask This Old House," our experts travel across the country to answer questions about your house.
♪♪ Today, Mauro is talking paint spills and how to clean them.
Oh!
Mauro: Look at that.
Kevin: I might not even put a drop cloth down, that came off so easily.
Then Heath gives a lesson on how three-way switches work.
What do I screw into what?
Heath: It looks confusing, but let me try and make it as simple as possible.
Kevin: And Nathan and Lee team up to bring some curb appeal to a homeowner's front yard.
Nathan: Less talky, more worky.
Kevin: On "Ask This Old House."
♪♪ Kevin: Hey, Mauro.
Mauro: Kevin, how are you?
Kevin: I'm doing all right.
Mauro: All right.
Kevin: Uh-oh.
Somebody spilled some paint.
Mauro: Already.
Kevin: You don't spill paint, do you?
Mauro: Sometimes a little drop here and there.
But, you know, when that happens, I try to clean it right away.
Kevin: Okay.
Mauro: All right.
So we have here some rugs, we have some hardwood floors, and we have tiles.
Kevin: All right, so I presume there's a technique for each.
Mauro: There is.
So we start with the rug.
Okay.
Let's put a little paint on this rug.
Kevin: You're just putting it in there.
Mauro: Yeah.
I hope the homeowner don't see it.
Kevin: Seeing you do that, Mauro, makes the hair on my neck go up.
Mauro: Don't worry about it.
I got the solution for that.
Kevin: Okay.
What do you got?
Mauro: I got warm water and soap.
Kevin: Just some regular detergent?
Mauro: Just regular detergent.
Just a regular one.
So go in and attack right on it.
But the key, Kevin, is like, no, wait.
As soon as you see the paint on the carpet, remove it right away.
Kevin: Can I see that rag?
So you know if the paint's on the rag, it's coming off the carpet.
Mauro: That's a good result.
I'm gonna wet my rag again on a clean spot.
Go right back to the green rug.
Kevin: So is this process basically just, you know, wet, dab, rinse, repeat?
Mauro: Exactly.
Kevin: And keep going?
Mauro: Keep going.
Once it's dry, it's going to be much harder to remove.
Kevin: Once the paint is dry.
Mauro: Yes.
Kevin: So, you know, the green is gone.
Mostly gone.
I mean, gone to me.
I'm colorblind.
But the carpet is still wet.
Not wet paint, but water wet.
Wet to the touch.
Mauro: Okay, so when it's still wet, you know what I do?
I got one of this guy here.
Kevin: Get a little wet dry vac there.
Mauro: Yeah, turn it on and we're gonna remove all the remaining green there and the water with it.
Kevin: All right.
So the proficiency with which you did that, Mauro, confirms that you've done that before.
Mauro: A few times.
I'm not gonna lie.
A few times.
Yes.
Kevin: That's impressive, though, because I would have thought the carpet was toast.
Hardwood floors.
Now, I got to assume that if you've got a hardwood floor, it's going to be a lot easier if you get after it quickly.
Mauro: If you get after this quickly, this is going to have a good result.
Once again, new rag.
Kevin: So same bucket of warm water and soap.
Mauro: Same bucket of warm water.
Go right to it.
Kevin: Oh, yeah.
No excuse.
Mauro: No.
Kevin: All gone.
Mauro: So good again.
Kevin: No damage to the finish.
Mauro: No damage to the finish at all.
Kevin: All the paint's right there.
Mauro: You see the green right there.
Kevin: Beautiful.
Mauro: All right.
Kevin: That doesn't surprise me, but I'm glad that you brought this here, because this is what I'm thinking.
A little spot.
I've missed it.
It's set up.
So what are you going to do in this situation?
Mauro: All right, first, what I like to do is get my vinegar and baking soda.
Kevin: So you made a little mix.
Mauro: Little mix.
We're going to spray a little bit on and we're going to try it.
Sometimes it works.
Sometimes we have to go a different way.
Kevin: You know you're saving marriages all over the country, pal, right?
Oh, yeah.
Mauro: That takes some off.
Kevin: I'm still in the doghouse, Mauro, if I leave it like that, so help me out.
Mauro: All right, so next step, we're going to use the denatured alcohol.
Kevin: Denatured alcohol.
Mauro: Denatured alcohol.
I'm going to open this up.
Kevin: There you go.
Mauro: Like that.
We're going to wet rag again.
Just like that.
And this should take care of that a little faster than the other one.
Kevin: Oh, yeah.
That's definitely getting it, right?
Daddy's eating a home-cooked meal tonight.
Mauro: Here we go.
Kevin: Love it.
All right, I know you could take that the entire way, but you've demonstrated that it's definitely coming off.
And as I look at that, the sheen of the finish is still there.
Mauro: Exactly.
This is what denatured alcohol will do.
Nice and gentle, remove the paint without disturbing the finish on the wood.
Kevin: So this is great.
I noticed that you've got a premium stripper right here.
Is this the next thing you go to if that doesn't work, or is this verboten?
Mauro: One thing.
When you use the stripper, not only it would take the paint, but it would take the finish from the hardwood floor.
It all comes together.
That's a no-no.
Kevin: That's a no-no.
Mauro: That's a no-no.
Kevin: Too far.
Mauro: Too far.
Kevin: Okay.
So third example is tile.
We got it laid down right here.
I'm presuming, given this type of material, that if it's wet paint it's going to clean up just as quickly.
Mauro: Just as quickly.
Yeah.
Kevin: What about if it's dry?
And I appreciate you bringing this one here where this is also not tacky and dried.
How would you start on that?
Mauro: What I would do, I would go with the denatured alcohol.
Kevin: Oh!
Mauro: Look at that.
Kevin: I might not even put a drop cloth down, that came off so easily.
Perfectly clean.
Mauro: Nice and clean.
Kevin: And this is actually a tile with a printed pattern on top.
And you didn't take any of the printing off either.
Mauro: Not even.
Kevin: So what I'm hearing is speed is your first best friend.
See something, do something.
Mauro: That's it.
Clean right away, you avoid a lot of headaches.
Kevin: Don't do it right away, you're going to have a problem with the carpet.
But at least you've given us a solution on the other materials.
Mauro: Absolutely.
It looks nice and clean.
Paint off.
Look like new again.
Kevin: Love it.
Thank you, Mauro.
Mauro: Thank you.
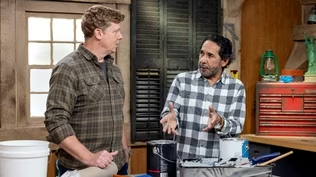
♪♪ Wow, Heath, you've been busy.
Look at this mock up.
Heath: Got a new hobby, Kevin.
Kevin: I guess.
You need better hobbies.
But no, this is good.
Heath: So here's how it kind of started.
I wanted to do a cutaway because I see Richard doing them all the time of showing tanks and everything.
It makes it really easy to explain things.
So I wanted to kind of explain how three-way switching works when you have multiple switches in locations to control lights or whatever else.
And I've been trying to cut one open to show the internals of it.
It blows apart every time.
I get springs going every which way.
I just couldn't make it happen.
So I built one instead.
Kevin: Richard's cutaway career is safe but you're coming at him with a mock up.
Heath: I'm coming at him with this.
Kevin: Okay, so we're talking three-way switches, which I'll be honest, as you know, I've called you on this many times.
It confuses me and I think it confuses a lot of people.
Heath: A lot of people.
It can be very confusing until you understand how they operate.
Then once you get that, it's usually fairly simple.
Kevin: So how does a basic circuit work?
If we're just talking about a single switch.
Heath: So to keep it simple, what we typically have is we'd have a two wire and a two wire, our feed and our neutral, and a two wire going out.
Kevin: And when you say feed and neutral, just for my purposes, in this case, the white is neutral, the black is the feed.
Heath: Exactly.
So we'd have power in.
And then when you close the switch, power back out to whatever you're controlling.
Let's say in this case it's a light fixture.
So the neutral will be made.
This will be open with the switch.
You'd close the switch, those would touch.
You open the switch, it opens.
Kevin: Okay.
And if we have two wires, then we need a switch, a simple switch.
Heath: A single switch.
Kevin: So a toggle switch like this.
Two wires means only two screws.
Heath: Correct.
Kevin: Ignoring the ground.
Heath: Ignoring the ground for now.
We're just talking about the circuit itself.
So black wire there, a black wire there.
It's simply open and closed, open and closed.
Kevin: Perfect.
So if this were just a simple switch right here, it's very straightforward, right?
Heath: Yep.
We have our white wire, our neutral, going all the way to the light fixture.
Then we have our black wire coming through.
Kevin: And if I turn the switch on... Heath: Goes to the light.
You can see it's a complete circuit.
Kevin: And so we always have to have that circuit coming in, coming back.
So if I turn it off, it just breaks it.
Heath: Just breaks it.
That simple.
It's just that one switch, on, off, on, off.
Kevin: okay.
In a three-way situation, we all know we now have two switches.
One when you get in the room, one when you leave the room, let's say, so that you can control from either side.
Heath: So with that we just need a couple of different things.
The first thing is we now need a piece of three wire going between instead of two wire.
Kevin: Okay.
So now we've got the traditional white, the black, but we've got the extra red.
Heath: Correct.
Kevin: And you said we need a new switch, which means instead of a switch with the two screws... Heath: Switch with three screws.
Kevin: So the two brass and in this case a black.
Heath: Right.
Kevin: Okay.
And here's the hard part.
This is what I always call you on.
What do I screw into what?
Heath: It looks confusing, but let me try and make it as simple as possible.
The easiest way for me to do this, and this can be done multiple ways, I always take the black and the red, and I always treat these as my travelers.
They're going between the two switches.
Those are going to our two brass screws, but we have a different colored screw, in this case that's black, that's our common screw.
Kevin: So similar screws are always the travelers and the oddball is always the common?
Heath: It is.
Picture it just like a little flapper going between.
So this common screw is our base point.
It just goes back and forth between those two terminals.
Kevin: Connecting this to there or this to there.
Heath: Exactly.
In this case we're going to have two commons, one on each side.
One's going to be our feed in, our power, and one's going to be the load out to the light.
Kevin: So let's just look at what you've already wired.
Here's our three wire, a three conductor in the middle.
And if I turn this around, you've taken the black and the red and immediately put it on the two similar screws.
In this case, the brass screws.
Heath: Correct.
Now we know those are out of the way.
Kevin: Okay.
And then you're taking the other wire.
Heath: Correct.
Kevin: In this case, up to the light.
Heath: Yep.
Kevin: Or in that case, back to the power.
Heath: And not breaking the neutral.
Which is why I chose wire nuts.
Kevin: So you've connected via wire nut there.
You've connected via wire nut here.
Continuous path.
Heath: Nice and simple.
So this is what we're seeing inside this box.
That white passes through but is wire nutted straight to the light fixture.
Our power in to our common.
Our black and red are our travelers.
And it goes to the other switch.
Kevin: And that allows us to do what?
If I'm in one side of the room and I want to turn it on... Heath: Turn it on.
Kevin: Can make the connection.
Heath: But if you want to turn it off... Kevin: I can go and break it over here.
Huh.
So again, continuous.
Heath: Neutral's still intact, never broken.
Kevin: But here's where the break happens.
Heath: And that's how that third wire helps.
Now you can control from multiple locations.
Kevin: And if you wanted to turn it on over there, even though it's weird to put the switch down, it makes the connection.
Heath: Doesn't care where you are.
You can come and go as you want.
Kevin: Huh.
Look at that over there.
Okay, so I have to remember if I've got a three-way circuit set up and for some reason it's not working... Heath: That's one of the number-one calls.
Kevin: Yeah, that's why I call you.
I'm like, wait a second, I just put a dimmer.
Heath: Yeah.
So we usually see two things happen.
The first one and the most common is someone wants to install a dimmer.
A lot of times you'll see three-way switches, either a kitchen or a dining room where you come in one side and out the other, and they want to put a dimmer on that light.
Makes perfect sense.
A lot of times what they'll do is they'll get a single-pole dimmer.
So it only has the two screws, not the three that we need.
When they do that, they're only attaching two and not connecting anything to the other runner.
So when you put the switch in one position, it'll work.
When you turn it off... Kevin: The other switch is useless.
Heath: ...it's not going to do anything for you.
The other way we see it is if they have a switch that failed or they want to change them and update them to freshen them up.
When they take the old three way out, they didn't pay attention to what wire was what.
And it happens all the time because you see a couple of black wires and a red wire in there.
I got screws, I'm just gonna put them on there, it'll be fine.
Kevin: Yeah.
Why are you looking at me like that?
Heath: I feel like I've gotten that phone call.
When it goes back in, a lot of times, the common, either the power or the light ends up on one of the travelers.
Same thing happens when that happens.
If one switch is in a certain position, it'll work, but when you put the other switch in the position, it won't work at all.
Kevin: So is that why you like this configuration?
Is that your sort of way of just kind of, you know -- Heath: It's the simplest, simplest way.
So if you're not sure, if you're looking at something, just to take kind of the basic thought out of it to make it really, really simple and standard, I take that black and red every time.
Those are my two travelers.
Those are to my brass screws.
The wire that's left that's not the neutral, the wire that's left over is simply my common.
That makes it the easiest way to follow and troubleshoot.
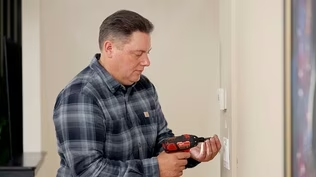
Kevin: If you have a three-way circuit, your switches have to have those three screws.
Heath: They do.
Kevin: And then you have to get that common wire correctly.
Heath: Correct.
Yeah.
Kevin: Excellent.
Heath: Once you figure that out, you can see how it operates.
The rest is pretty simple.
Kevin: So the only thing that I have a problem with is the fact that in my electrical bag with my lineman's, my tape, my tester, I don't have room for this, and I need to take this with me.
Heath: I'll make you a video.
Kevin: This is beautiful.
Thank you, Heath.
Heath: Thanks, Kevin ♪♪ Nathan: Hey, Jon.
Jonathan: Hey, Nate.
Nathan: How are you?
Jonathan: Good, good.
Nathan: You wrote me about a fence.
Jonathan: I sure did.
Nathan: Let's take a look.
So is this where you're thinking about putting the fence?
Jonathan: Yeah.
So what I'm looking to do or have here is some separation between, you know, my lawn and the street.
Because as you can see, there's a bit of a low-lying area here from cars driving on when they're either guests, sometimes neighbors who are visiting other people.
Nathan: Yeah.
Jonathan: And, you know, that killed a lot of the grass.
And in general, I don't have any separation between my property and the street.
Kind of like my neighbors do with fence over here, some bushes over there.
So it'd be great to have something here.
Nathan: All right, I can definitely help you kind of define the space, put in a fence.
But we might want to bring in a little bit more manpower for that.
Let me give my buddy Lee a call and see if he can come give us a hand.
Jonathan: Sounds good.
Nathan: All right.
John, I'd like to introduce you to Lee.
Lee: Hi, Jon.
Nice to meet you.
Nathan: So we're driving over and we're having a conversation.
And the first thing that came up was 811.
You know, we want to make that phone call before we do any digging in the yard.
They're going to come out.
They're going to check for gas.
They're going to check for water, electrical, cable, anything that might be buried.
So we want to make that phone call first.
So actually I've already called 811 and they said we are good to go.
Nathan: You were ahead of the game.
Lee: I think we're in great shape.
We already have some existing cobblestones in, Jon, so why don't we, you know, go off of that.
What do you think?
Jonathan: That sounds like a great idea.
Lee: And they look good.
Nathan: Get started with the layout?
Lee: Yeah.
Let's do layout.
Do some measurements and go from there.
All right?
All right, let's go.
Jonathan: Sounds great.
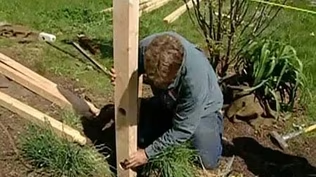
Nathan: All right, I think a classic post-and-rail fence would look really sharp.
Lee: That'll look really nice.
Nathan: So let's say maybe about 2 feet off the backside of that cobblestone.
Jonathan: All right.
Nathan: This mailbox, I feel like it's seen better days.
Jonathan: It absolutely has.
Nathan: Let's take it out and put a new one in.
So we'll put the mailbox down there.
New one.
And then we'll do that.
Lee: Start right about here?
Nathan: Post right there, yeah.
Lee: Okay.
Nathan: And we're going to work in about 8-foot lengths.
All right?
So we'll drop a post at 8 feet there.
Lee: Another one here.
Nathan: Yeah.
Come down to 16 feet.
We'll drop a post there.
Lee: Okay.
Another one here.
Nathan: Yep.
Nice.
And then we'll cap the ends at 24' right there.
Lee: Okay.
Perfect.
Good?
Nathan: So four posts, some rails.
But when I'm done, it'll just be a fence.
Lee: Okay.
And then let me come in, all right?
And I think we should bump it out a little bit, the bed itself, like 36", 3 feet off the cobblestone will look really nice, nice straight line about here.
And that will give me room to put some plants in here because a plain fence, Jon, I don't think it's going to look too good.
Jonathan: Yeah.
Lee: You know, I'm thinking, like some climbing roses, maybe some spirea, you know?
Jonathan: Sounds like you have a lot more style than I do.
Lee: Okay.
[ Laughter ] But first, let's get this grass out of here.
Jonathan: Yeah.
Sounds great.
Lee: Ready to go?
All right, let's do some work.
Nathan: Less talky, more worky.
Lee: Yeah.
Nathan: I'm gonna get started with this mailbox.
Jonathan: Okay.
Nathan: Lee, help me.
Lee: You need some help over here?
Hold on one second.
Nathan: You ready?
Lee: Yep.
Which way do you want to go?
Nathan: Go straight up.
One, two, three.
There we go.
Thank you.
Lee: Okay.
All you want to do is just want to get underneath the grass.
You want to -- I don't want to go too deep, and I don't want to go too shallow.
Nice job.
Jonathan: All right.
♪♪ Lee: Thanks, Nathan.
Nathan: Yep.
So, I think our first post is going to be around here somewhere.
Lee: Yeah.
So the reason why we're doing this, so the fence will be straight, right?
Nathan: Nice and straight.
Lee: Okay.
Nathan: All right, so there's 2 feet there.
We'll go down this end.
All right.
We'll go down here a little bit past our 24-foot mark.
Lee: That looks pretty good.
Nathan: Like it?
Lee: Yeah.
Nathan: All right, John, here are the parts that we need to put together your post-and-rail fence.
I have here in my hands the end post.
You can see it's mortised on this side, but it doesn't come all the way through for a nice, clean look.
Jonathan: Gotcha.
Nathan: In your hand, the through post is mortised all the way through.
Jonathan: All right.
Nathan: And then Lee has the rails with the doweled ends that are going to tuck right inside.
Jonathan: Looks good.
Nathan: So we have our string line set up.
We'll have a nice straight fence.
We need to do a little bit more layout, give ourselves some rough locations that we're going to start digging some holes.
Then we'll move the string line so we can dig them.
And when we start putting things together, I like to start on this end because this is a little bit more important.
The waste can go that way.
So 2 feet down, that'll put us about to the top of the grade.
So about 10 inches from the bottom rail.
We'll run it out level.
Look pretty sharp.
Jonathan: What's the typical life on these?
Nathan: Cedar, 30 years.
Lee: Yeah.
Nathan: We can start doing our layout.
Lee: Okay.
Nathan: One of the ways -- Lee: Put this down?
Nathan: Yeah, drop that rail.
Lee: Okay.
Nathan: Right on the ground like that.
We know our first post is going to be right here.
Dowel is going to tuck inside of our post.
Lee: About 2 inches inside, correct?
Nathan: 2 inches inside.
Lee: Yeah.
Nathan: So we'll dig a 2-foot hole there.
Jonathan: Okay.
Nathan: And we'll come down.
We know that's going to be inside the post.
So that's the center.
We can dig a hole there.
Jonathan: Why 2 feet?
Nathan: 2 feet down -- low enough that it's nice and stable, not too deep, you're not going to hit any utilities.
It's not really a high fence.
Will be about 3 feet above grade.
Lee: There's no weight on this fence.
It's not like a fence panel where you might want to go down 4 feet.
Nathan: It's not like a big sail or anything like that.
So I can move this down.
Lee: Okay.
Slide it down.
Nathan: All right.
Right about there.
All right.
Lee: One more, and then that's where it's going to end up down there, Jonathan, right there.
What do you think?
Jonathan: Yeah.
That looks good.
Lee: Okay.
Nathan: Good.
All right, let's start digging.
Lee: Okay.
Just hitting the ground.
Spread your arms and bring out material.
Jonathan: Okay.
♪♪ That's good arms day, you know?
♪♪ Lee: Pretty good.
Jonathan: Nice.
♪♪ Nathan: We want it to be plumb, and we're going to backfill with some stone dust.
This will compact nice.
It'll drain.
It's going to be a lot better than cement.
Lee: Cement has an issue it might rot the post, so we don't want to do that.
Nathan: Perfect.
Now we can start digging our second hole.
Lee: Okay, good.
Nathan: Yep.
Lee: Sneak in there.
Yep, I got you.
♪♪ Nathan: All right, so we get our post in there.
And one thing I want to do is we're going to slide a rail in is I want to I want to run this out level.
Because the grade kind of goes up and down a little bit.
All right, so we want to backfill that hole just a little bit to run out level.
Jonathan: Okay.
Nathan: Put our top rail in.
Lee: Jon, can you do me a favor?
Can you grab me that piece of scrap?
Jonathan: Sure.
♪♪ Nathan: That's good right there.
Jonathan: Good?
Nathan: Yeah.
Lee: Good.
Nice.
Nathan: All right, lean it just a -- Give it just a touch back towards the house.
Yeah, that's perfect right there.
Lee: Okay.
Go ahead.
Nathan: Very nice.
Lee: Tap that.
♪♪ Nathan: All right, so we have these posts tamped down.
And then we backfilled around and we push it down with our foot.
But one of the best ways to compact the material is actually just to run a hose at the base of each post, let it pool up, then filter down, pool up, and then I'm going to drive these nails in.
Lee: I'm going to rototill the beds so we can get ready for some planting.
Nathan: All right.
Sounds good.
Lee: Jonathan, we have the spirea here.
Golden leaf one on it.
It's really nice.
Really pretty.
Jonathan: What's the expected coloring for the flower?
Lee: This one here should be a nice soft pink, you know?
And then I offset it with this.
This is black-eyed Susans.
It's got the seed pod right here.
Jonathan: Okay.
Lee: And that's what the birds like later in the fall.
So this catmint, this is going to cascade over, over the cobblestones that we have.
And look at that.
That's really pretty.
And this will get good size.
Okay?
And then on the back side, I got a rose bush.
So when they start growing up, just maybe help it train along the rails, okay?
♪♪ Spread that around nice.
Keep it fluffy.
Keep it natural.
Perfect.
♪♪ Nathan: All right, Jon, what do you think?
Jonathan: I was just expecting a fence, and you guys delivered a heck of a lot more.
You know, the plants, everything.
It just looks amazing.
Lee: Came out good.
Nathan, you knocked it out of the park by putting the fence in.
It looks good.
Nice and level, straight.
You can't ask any better.
Nathan: You got Lee's personal touch on these plantings.
I think this will really keep people off your lawn for sure.
Jonathan: I hope so.
Nathan: You're in good shape.
Lee: Let's make sure.
Nathan: Any homework, Lee?
Lee: Yes.
Ready?
Jonathan: Yes.
Lee: Water, water, water.
Give me at least 15 to 20 minutes of watering twice a day.
Jonathan: Twice a day.
All right.
Lee: Keep everything hydrated.
That'll work out really well.
Jonathan: Gotcha.
That sounds good.
Nathan: Enjoy it.
Jonathan: All right.
Thanks for your help, guys.
Lee: Talk to you soon.
Good job, Nathan.
Nathan: Good job, Lee.
Go get a beer.
Lee: Yeah.
Two.
♪♪ Kevin: Next time on "Ask This Old House," do you have questions about the various types of caulking materials and when to use them?
Tommy has all the answers for you.
Then Richard helps a homeowner install a garbage disposal that uses an air switch.
And I host some special guests from the popular online channel Toys and Colors in the workshop to build a dress-up closet.
All that on "Ask This Old House."


- Home and How To

Hit the road in a classic car for a tour through Great Britain with two antiques experts.


Support for PBS provided by:
Funding for Ask This Old House is provided by The Home Depot, Renewal By Andersen, and ChipDrop.